If you are a kodi user and fond of Movies and TV shows, then you definitely have heard of some great video add-ons to stream online and free. I am sure you haven’t missed the Crew addon, Exodus redux or the famous Covenant. But today I am introducing another different style, yet powerful and free add-on, it is Gaia addon
Gaia is a fork of another famous addon called Bubbles. With this addon, you will have access to a large number of movies and series. Gaia may currently stream more high-quality Movies and TV Shows than any other addon. its scrapers scan links from various sources across the internet to get the best ones with video streams in 480p, 720p, 1080p, and even 4K, and provide high-quality content. Confirmed result: enhance your streaming experience on kodi.
What makes this video add-on really special is its compatibility with third-party services including Real-Debrid, Trakt.tv, Premiumize, IMDb, Orion, Fanart, OffCloud, EasyNews, AllDebrid, Rapid Premium, or Emby.
These services will allow you not only to get recommendations and keep track of everything you see but also and more importantly to obtain high-quality links to play any streaming content at the highest speed that your connection supports. In fact, if you install Gaia, the use of Real Debrid is highly recommended.
Gaia addon is now available in Gaia Repository.
So, install the addon and enjoy HD content for free.
How to install Gaia addon on kodi
This guide will show you how to install Gaia addon on Kodi 18.9 Leia. The guide is accompanied by screenshots and can be used to install the addon on any device that is compatible with Kodi
Enable installation from unknown sources
The most interesting Kodi Add-ons are included in unofficial repositories. Gaia Add-on can be found in the Gaia Repository which is third-party sources. So, the first thing you have to do is enable installation from unknown sources. If not already done, just follow these steps
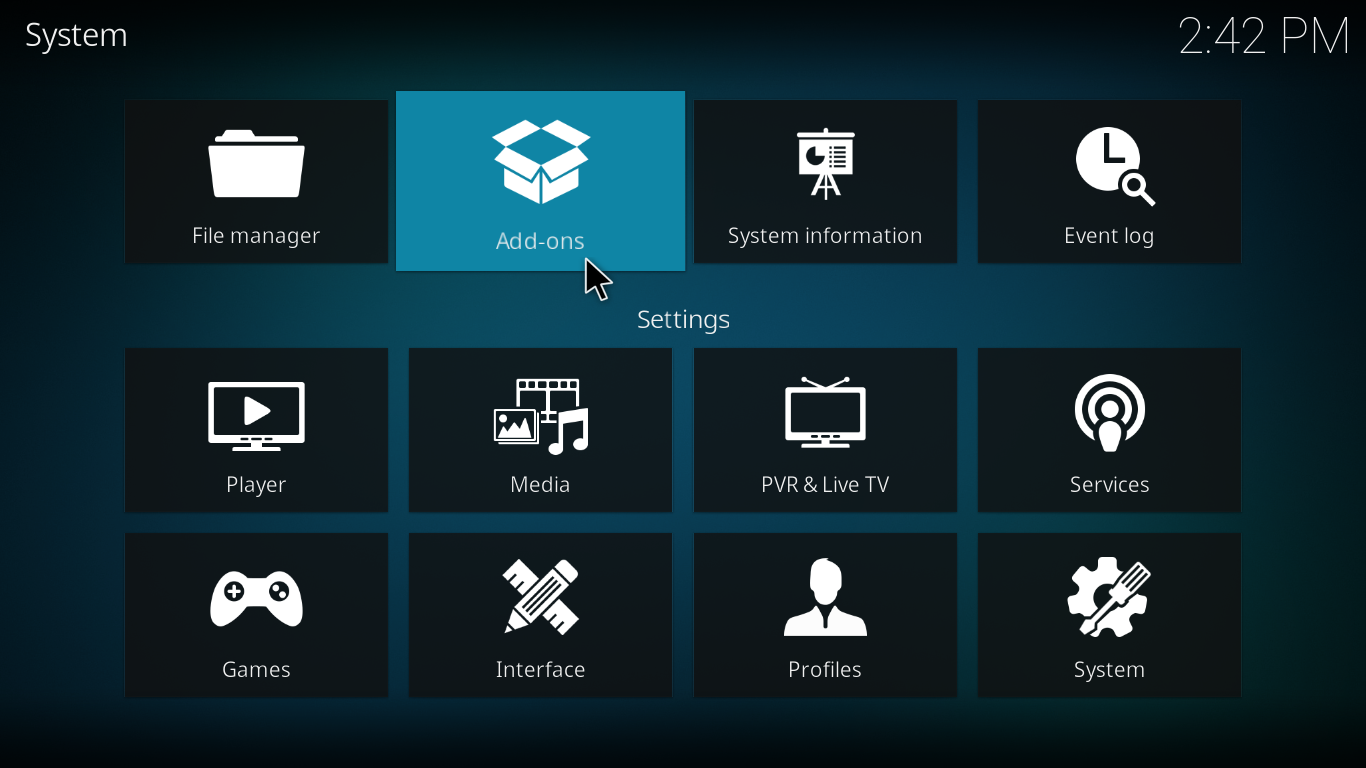
Launch Kodi and click on the “System Settings” Icon.

On the next page, click on “System Settings” as shown in the image below.

In the “Add-ons” tab of the left panel, make sure that the ” Unknown sources ” option is activated.

The option is disabled by default for privacy and security reasons, but you must enable it before you can install add-ons from outside the official Kodi repository.
Install Gaia Repository
Here’s a step-by-step guide on how to Install Gaia Repository
To do so, follow these steps:
Launch Kodi and click on the “System Settings” Icon.

From the available options, select «File manager»

Then select «Add source»

Double click «<None>»

Enter this link: https://repo.gaiakodi.com/in the box at the top of your screen. Be sure to type this exactly as provided. Click OK

Your repo needs a name ” Gaia“ in the box below> then Select “Ok“.

Return to the System Settings home screen> and Click the Add-ons Package Installer
Select “Install from zip file“

Find your repo under Gaianame

Select repository.gaia.zip

Wait for the top right to popup Gaia Repository installed.

And this has been all regarding the repository installation. It is a valid process for any third party repository.
Install Gaia addon
Now that you have Gaia Repo on your system, you need to install Gaia Addon.
Now go to Install from repository

Click Gaia Repository

Then Video add-ons

Select Gaia

Click Install

A box will popup showing all the dependencies and add-ons that will be installed Click OK

On the top right, a pop-up will let you know that your add-on is installed you may also see a setup wizard for YouTube.

The YouTube wizard will only show up if you are setting up the YouTube addon for the first time. It will not show if you have already configured the addon before, either independently or as part of another addon.
To configure YouTube you will have to follow the steps below:
- In the first step of the YouTube configuration, you will be asked if you want to run the setup wizard. Click Yes to continue.
- The next prompt will ask you to select the language and region of Kodi. Click NO
- Then you will be asked if you want to activate geolocation in order to automatically detect your location. Click No
YouTube setup is done
Setup Gaia addon
After installing Gaia you will have to configure it, which is something that we cover in the next section of this guide.
Now go back to kodi home screen, Find Add-ons tab on the left side menu and launch Gaia Addon.

The first thing you get after launching the app is that beautiful splash screen of Gaia 5

Then comes up the Disclaimer notification, press Agree

Then a message will be displayed indicating that the Gaia wizard will be executed. Click OK to continue.

The next window will get you prepared for the following step to choose the right setting structure for the right device. click ok

Now you will have to choose the appearance that the Gaia interface will have , which will depend on the device on which you are going to run Kodi and the input method. If you use a PC, choose the first option, optimized to use a mouse. If you are not going to use a mouse, like when you use a android TV device , choose the second option.

The next move will be to choose the default setup to apply to Gaia. Various options are offered. If you want to make you life easier just go for the Automatic setup and let Gaia do the job for you. If you want to make you own touch and configure both providers and some other services like track then go for the Reaper Setup
If Automatic Setupselected, a message will be displayed indicating that the configuration is complete. Click Finish
For The Reaper Setup there is still work to do
The Reaper Setup
Select Reaper setup from the wizard

A message will pop-up to tell what this option is about. Click OK

Then another notice will let you know that no official support to be expected in case of issues with the preset. Click Yes to continue

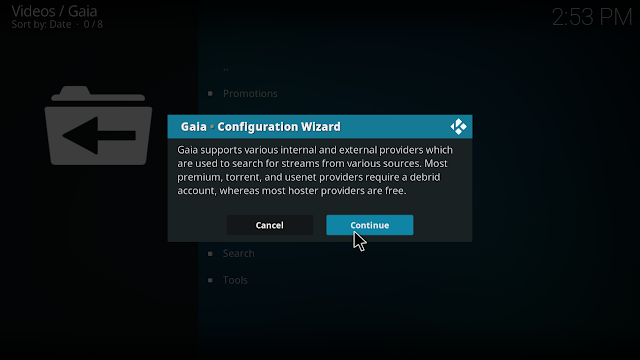
The following prompt will be about third-party services and providers used by Gaia. Click Continue

In the new window you can configure the different services integrated into Gaia. When selecting a service, you will have to enter the access data or API keys of the selected service. You can always come back for that later when done setting up Gaia. click Continue .

Next prompt will be about the different internal and external link providers. Click Continue
Next window will show a list of providers. Some are selected by default. You can setup some others or just leave things as they are and click Continue

Here you will have to choose how to start playback after Gaia finds links. Select automatic if you want Gaia to select the best link for you, or select manual to take control of your own decision

That is all, Click finish

And after this last step, you will see a message with the latest news about the addon , then the main sections.

How to optimize the provider timeout
Gaia gives you also the chance to optimize the provider timeout according enabled providers, your internet connection speed or device hardware. To do so, follow these steps:
From the main menu go to Tools>>> Providers >>> Optimization

Click Yes to continue

The system will analyze your hardware and connection speed

Then provide results with recommendation.
If you are happy with the recommendation just click accept. Otherwise clickadjust and setup the timeout as you wish.

Click Done once finished

How to verify providers on Gaia addon
Gaia offers a tool to verify providers. Indeed, it is recommended to use this tool whenever you install a provider. To do so, follow these steps:
From the Gaia main menu, select Toolsand scroll down to find Verification

Select Providers

Gaia will start the test to check if providers are operational, disabled, limited or failed then display the results


Then a message will ask if you want to automatically activate the providers that work and deactivate the failed ones. Click Yes

Now that the providers are configured and verified on Gaia. We are going to see how to integrate various accounts on Gaia. We take Real-debrid for example.
How to set up Real Debrid on Gaia addon
To setup Real-debrid account on Gaia. Enter Tools option from the main menu. Select Settings >>>Advanced >>> accounts
Find Real-debrid in the list and turn the toggle on to activate it then click authentication to get the verification code

A token will be displayed on the next screen along with the instruction to follow. Copy or write down the code

After having registered on the Real-Debrid page and having accessed your account from any browser, you must access the URL https://real-debrid.com/device and enter the access code you already noted down.

Once done, Real-debrid will provide you with tons of high quality links. Enjoy
The steps explained above are completely valid to setup any other account on Gaia like trackt or allDebrid. Just follow the same path Tools >>> Advanced>>> accounts >>> select account from the list and activate it >>> authentication >>> the code and the instructions should appear on the screen.
How to verify accounts on Gaia addon
You can also verify your accounts via the verification tool on Gaia. The process is similar to verifying providers.
Tools >>> Verification >>> accounts and the verification will start, upon which a message will ask for your OK to delete failed accounts
This was a complete guide to install, setup and get started with one of the best kodi add-ons available for streaming good quality movies and TV shows from various providers. Go ahead install and setup Gaia like a pro.
However, always make sure your VPN is connected , to avoid copyright infringement issues.


