


This guide will show you how to install the Alfa addon on Kodi. With this addon you will be able to watch Movies, TV Shows and Documentaries in both Spanish and Latin Spanish. It also includes a section with content in original version.
The process was performed on the latest version of kodi media center available to date, and should work fine on older versions as well.
The steps described in this post apply to all devices and platforms that support Kodi such as Android, Android TV, Fire TV, Linux, Windows, and more.
If you are new to Kodi, this ultimate guide will help you get started and set up the media center correctly.
Also, although it is not necessary, we highly recommend updating Kodi to the latest version. Updates are always useful because they fix problems and make improvements.
What is Alfa addon?
Alfa addon is a unique kodi source that allows users to stream an extensive catalog of Movies & TV SHows with great quality. Hosted in the Alfa-Addon Repo, this addon is fully compatible with the latest Kodi
Alfa addon is one of the best kodi addons that focus on Spanish content. This addon features an interface which is both attractive and minimalistic, including a few sections that will allow you to access a lot of features. Icon sets are included for the different interface elements.
Similarly to Sports addons and most other Movies & TV Shows addons, Alfa addon does not host any content. It uses web scrappers to fetch links from around the web and introduce them in a beautifully designed UI.
With Alfa you will be able to search for content on different channels and servers. You will be able to customize the search results, and you can also configure each server and each channel separately.
Before we continue, let’s clarify that we are not talking about TV channels, but about content channels. These channels organize the different titles in different categories and then search and index them from different servers.
This addon is not only limited to the usual links, but you will also be able to watch contents from Torrent links. This functionality is not too much exploited in Kodi except in the case of Addons like Elementum, so it is a luxury that Alfa is also able to manage Torrent files, being able to watch them in streaming while they are downloaded.
With Alfa you can also save different links or download any file to create your own local video library. Finally, it is important to say that Alfa also supports Real Debrid and All Debrid links, which are paid services that will allow you to download contents at the maximum speed supported by your connection.
All these amazing features make of Alfa addon one of the best kodi sources to watch Movies and TV Shows for free. All you have to manage is a smooth internet connection and get Click Here addon installed on your media center, which I will show you in details in this guide.
How to install Alfa addon on Kodi
Now that you know what Alfa Kodi addon is and how to protect yourself when using it, you may want to install it on your device and enjoy its content.
The installation process is straightforward, but it requires some steps to follow. Here are the steps to install Alfa addon on your device:
- Enable unknown sources in Kodi settings
- Add a media source in Kodi file manager
- Install the Luar program addom from zip file
- Install Alfa addon
For detailed instructions with screenshots, please keep reading
Enable installation from unknown sources
If you are installing an add-on or repository from a ZIP file for the first time, the first thing you have to do is enable installation from unknown sources.
This is a security feature that prevents Kodi from installing add-ons that are not verified by the official Kodi repository.
However, many popular and useful add-ons are available from other sources, so you may want to enable this option if you trust the source of the add-on. If not already done, just follow these steps:
Launch Kodi and click on the gear icon on the top-left corner of the home screen. This will open the settings menu.


Click on System on the bottom-right corner of the settings menu. This will open the system settings menu.

From the left sidebar, select Add-ons. On the right side, you will see a toggle switch for Unknown Sources. Click on it to turn it on.

You will see a warning message that says “Add-ons will be given access to personal data stored on this device. By allowing, you agree that you are solely responsible for any loss of data, unwanted behavior, or damage to your device. Proceed?” Click Yes to confirm.

That’s it! You have successfully enabled unknown sources on Kodi. You can now install any add-on from any source that you want.
Install Luar Addon from a Zip file
Installing an addon from a zip file is quite an easy process, all it takes is to download a zip file to your local storage then upload it to Kodi. This is how you can do it:
First download the .zip file from this link and remember the folder where you save it, you will be using it later.
Launch Kodi and click on the “System Settings” Icon.

Go to the System Settings home screen, and click the Add-ons Package Installer

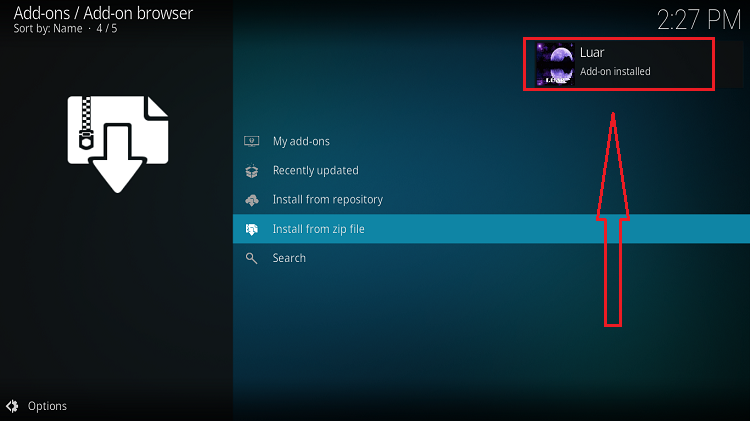
Select “Install from zip file“

Now, in your locally stored files, find and select the Zip file you previously downloaded. Normally it should be in the Downloads folder unless you specified another path.
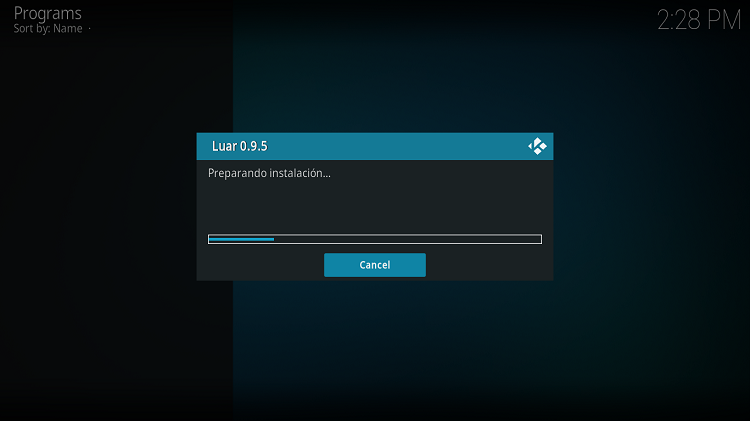
The file will have a name like script.luar-xxx.zip. The installation should start as soon as you select the file.


The script will install Luar’s repository and add-on, the installation process might take a couple of minutes. You’ll be asked to switch Kodi’s interface language to Spanish, press No to keep your original language and wait until the installation process is done., you will be notified that Luar Repo installed.
And this has been all regarding the repository installation.
Install Alfa addon on Kodi
Now that you have the Luar Repository installed on your system, you need to install Alfa addon.
Go back to the home screen. Reach the Add-ons menu on the left panel > select program Add-ons > open Luar addon

Wait for the addon to finalise installation
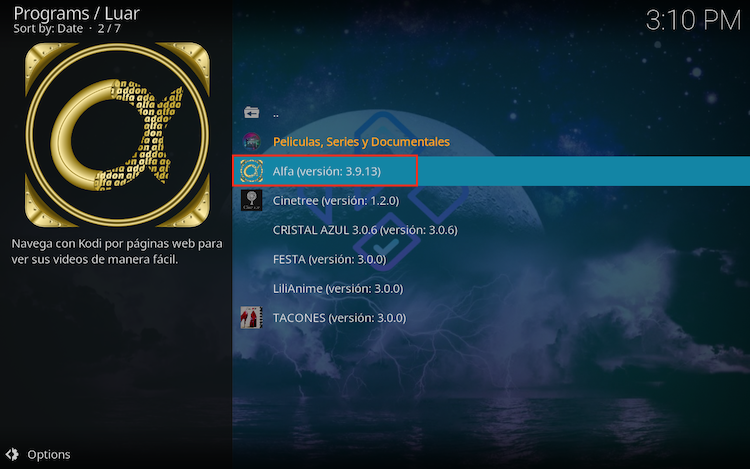
Now the Luar addon displays all the available sections and categories. To procede with the Alfa addon installation, select Por Categorias
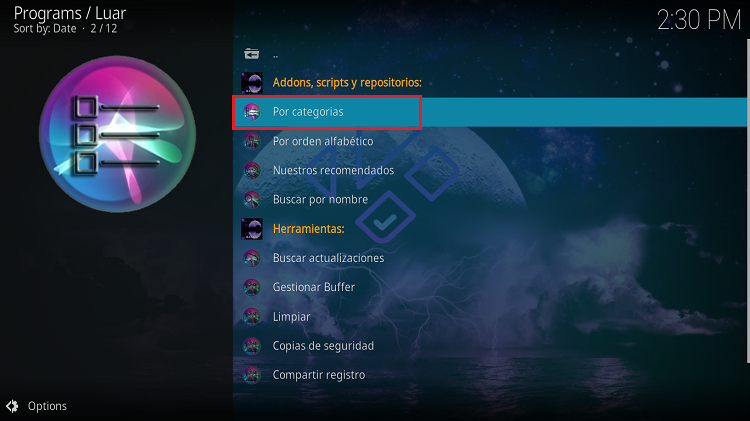
Select Películas, Series y Documentales

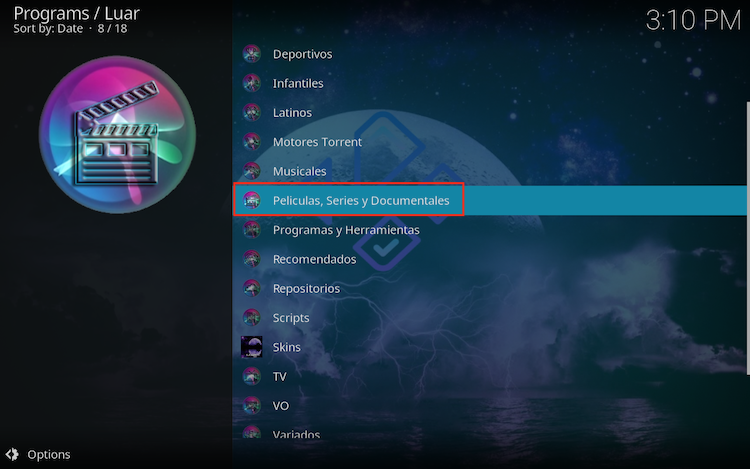
Then select Alfa addon from the list
Click Instalar
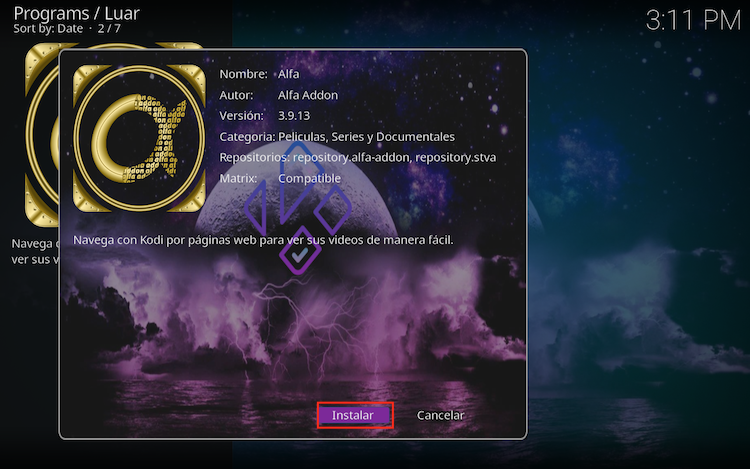
Select a repository, we will use the most up-to-date repo which is : repository.alfa-addon(Alfa 3.9.13)
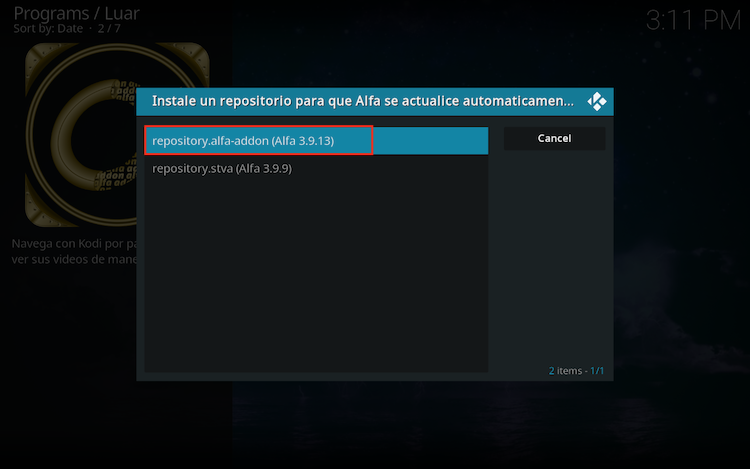
Wait until the notification appears that the Kodi addon was installed successfully
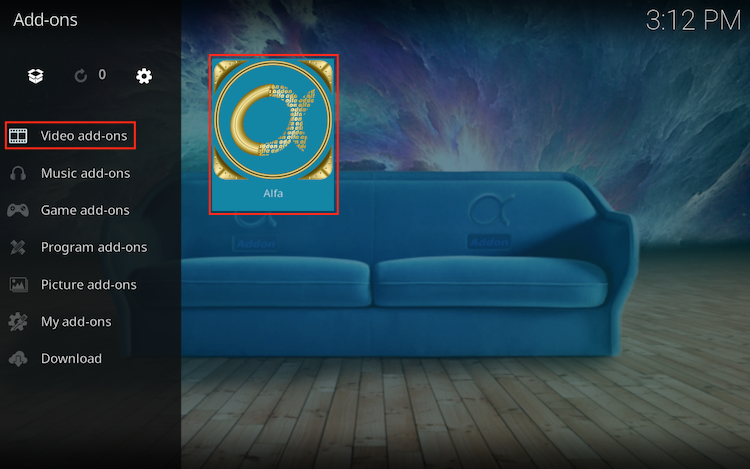
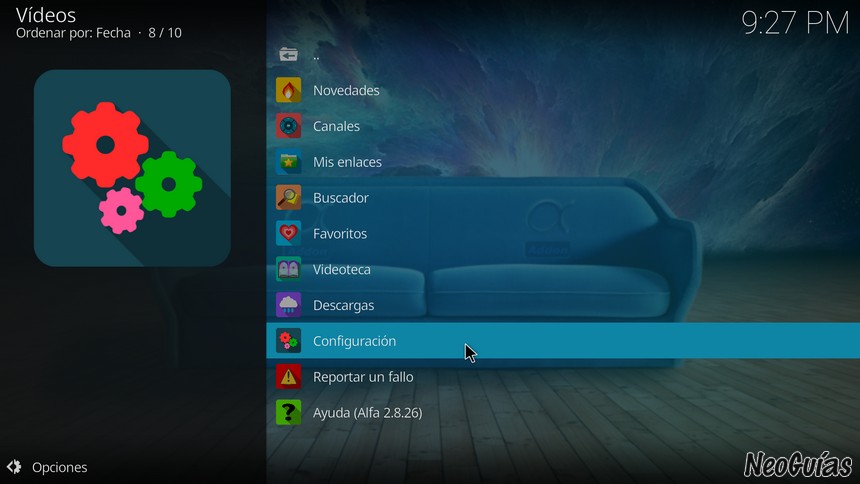
Now go back to the Kodi home screen, find the Add-ons tab on the left side menu,Alfa addon should appear under the Video add-ons category.
Once launched, Alfa addon lists all the available categories of content.

With Alfa you will be able to search and play movies, series and documentaries from various content servers via the Internet, although it is also possible to access Torrent files. It is an addon that you can customize a lot, being able to configure the channels, servers, searches, downloads, the Torrent client and the different sections of the addon. It also includes an automatic replay or autoplay functionality with which Alfa will automatically begin to play the best link it finds based on the established parameters, without you having to select it.
On the main screen of the Alpha you can find all the main sections that the addon includes
If this is the first time you start the addon you will have to configure the search engines. First you will need to configure Alfa addon with the setup wizard. The setup wizard will guide you through the necessary steps to correctly configure Alfa addon to your liking.
How to set Real-Derid and in Alpha
Through Real Debrid and All Debrid you can download content at the maximum speed that your connection supports. They are premium services that you can hire for a small amount of money that you will pay monthly or annually, depending on the chosen subscription. To configure these services follow these steps.
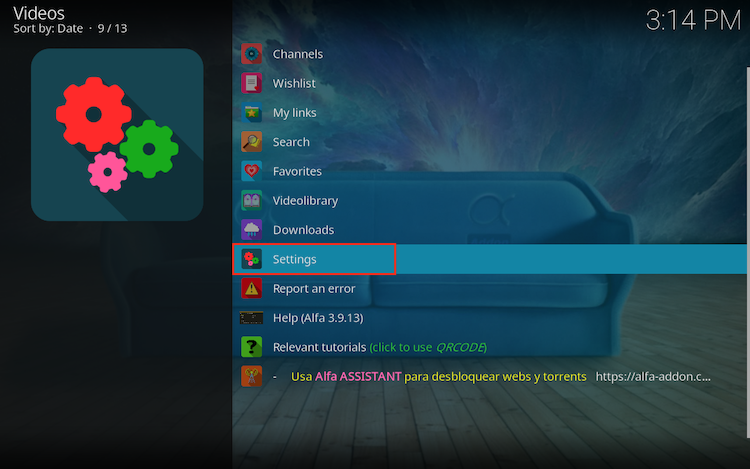
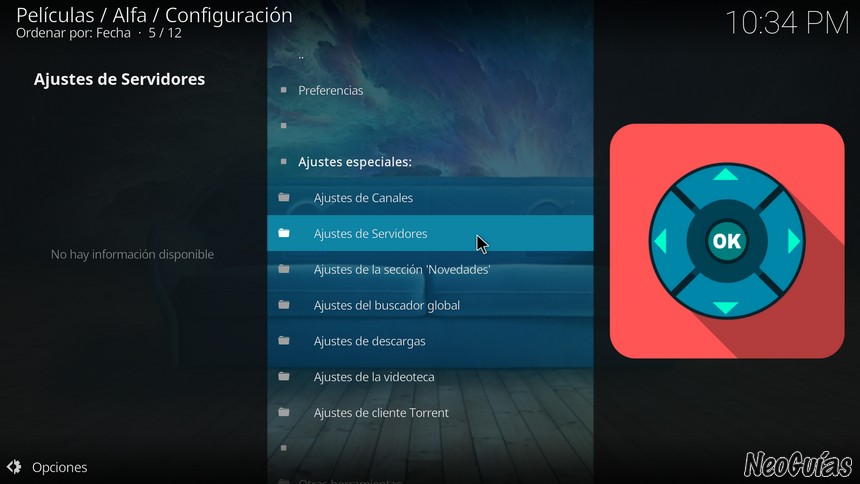
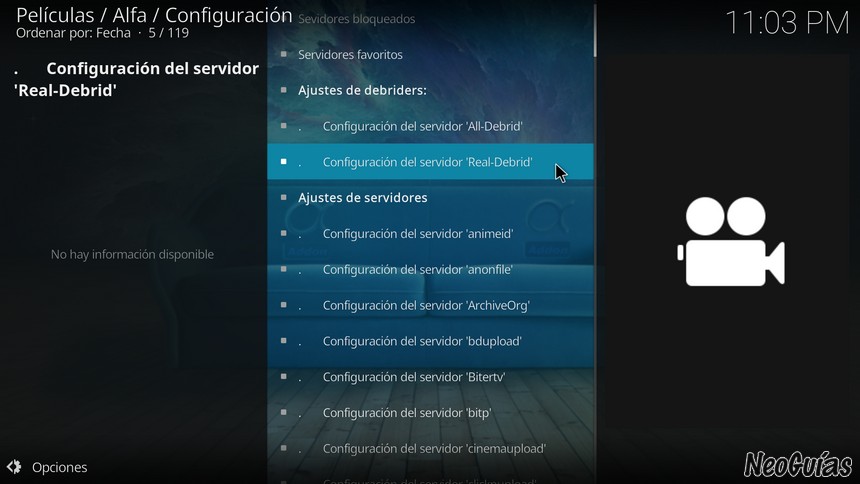
Access the Alpha Settings section
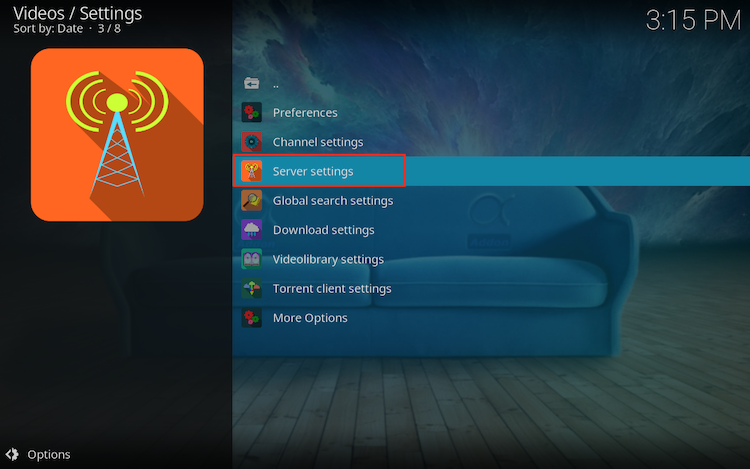
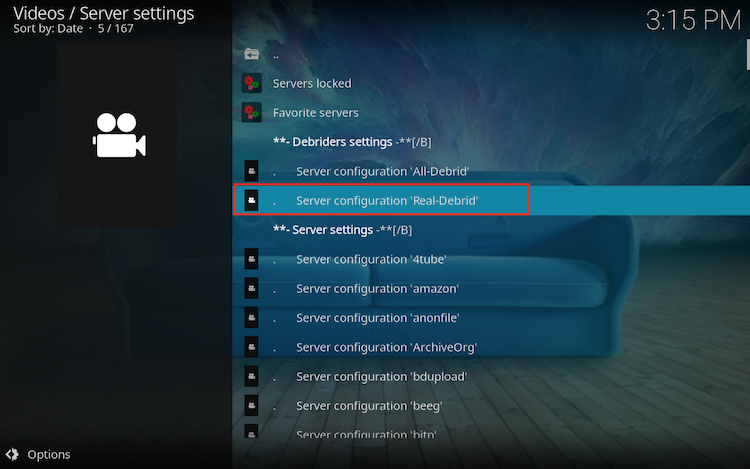
Click on the Server configuration Real Debrid option .
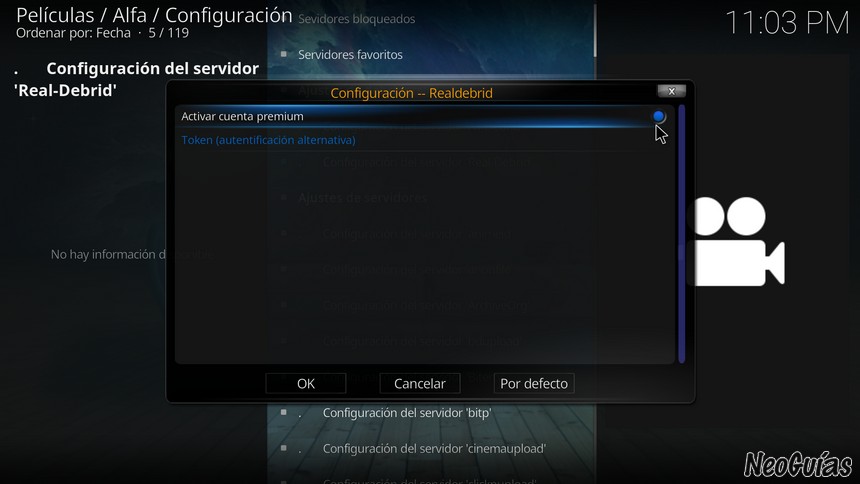
Click Activate Premium Account .
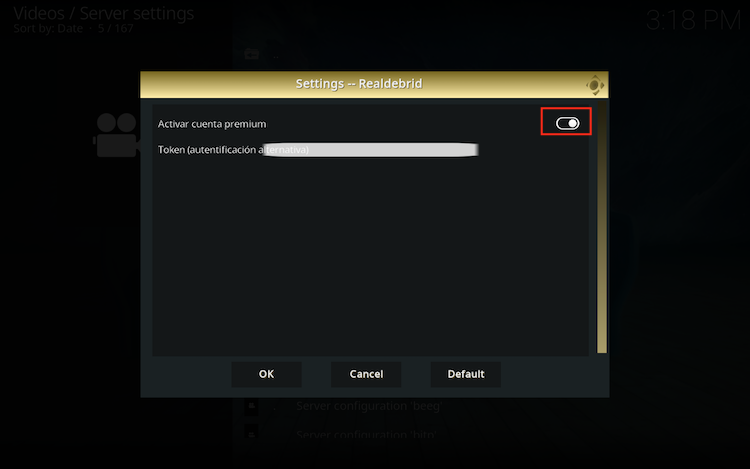
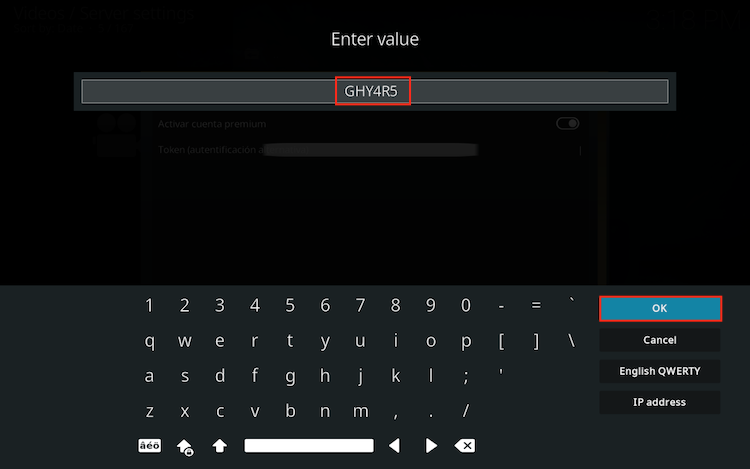
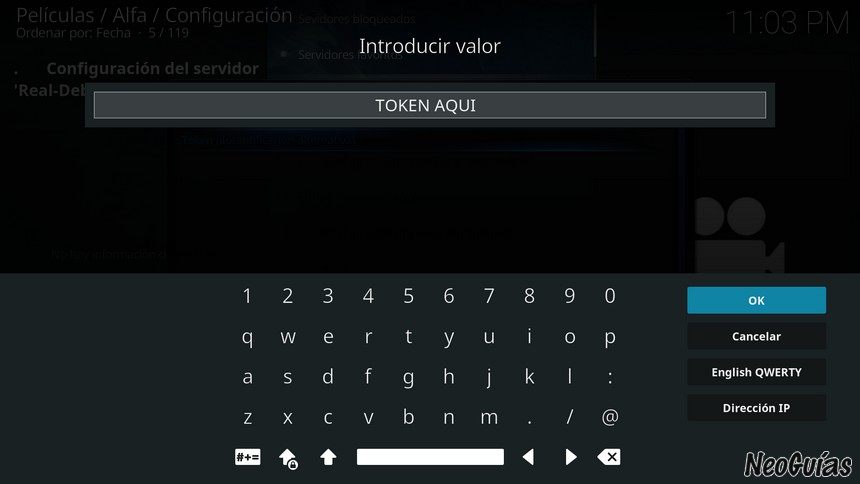
Then click on Token (alternative authentication ) and enter the token that you should have previously generated in your Real Debrid account.
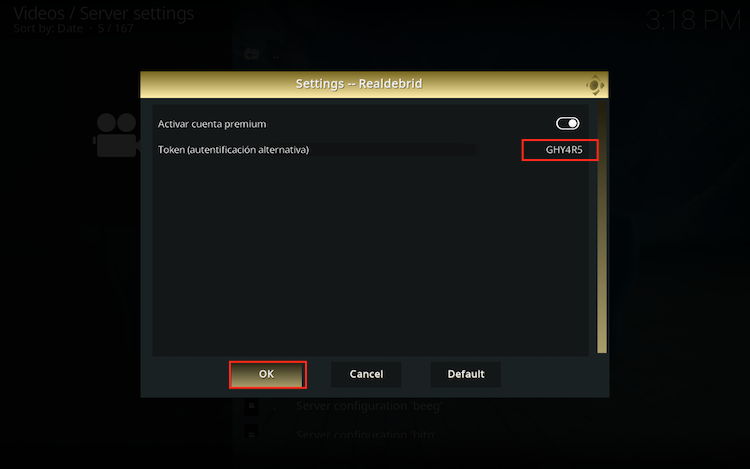
Finally, click OK to save the changes.


")
