Are you ready to unlock an unparalleled world of entertainment on Kodi? The Crew Kodi addon is your one-stop solution for a vast library of movies, TV shows, live sports, and even kid-friendly content. Known for its reliability and frequent updates, The Crew stands out as a top choice for Kodi users seeking diverse and high-quality streaming options.
This comprehensive guide will walk you through every step of installing The Crew Kodi addon in its latest version. Beyond installation, we’ll delve into advanced configurations like integrating Real-Debrid and Trakt, offer a robust troubleshooting section for common errors, and provide tips for optimizing its performance. Our goal is to empower you to enjoy a seamless and frustration-free streaming experience.
Introduction to The Crew Kodi Addon
The Crew is a popular third-party Kodi addon renowned for its extensive content library. Whether you’re in the mood for the latest blockbuster movies, binge-watching your favorite TV series, catching live sports events, or finding engaging content for children, The Crew delivers.
Its dedicated sections ensure easy navigation to whatever you desire.
Why choose The Crew?
* Reliability: It’s consistently updated by its developers, ensuring working links and new features.
* Content Variety: From on-demand video to live streams, its breadth of content is impressive.
* Community Support: A large user base often means quick solutions to common queries.
This guide provides a detailed, step-by-step installation process, comprehensive troubleshooting for common errors, optimization tips, and insights into its advanced features. Get ready to transform your Kodi experience!
Disclaimer: When streaming with Kodi addons, your online activity might be monitored. This monitoring could be done by ISPs, governments, or other third parties. We highly recommend using a Virtual Private Network [VPN] for privacy and security. A VPN encrypts your internet connection, masking your IP address and protecting your identity.
Before You Begin: Essential Prerequisites for Installing The Crew Kodi
Before diving into the installation of The Crew Kodi addon, ensure you have the following in place for a smooth and successful setup.
Ensure You Have the Latest Kodi Version Installed
It’s crucial to run the latest stable version of Kodi. Older versions might have compatibility issues or lack features required by modern addons.
* How to Check: From the Kodi home screen, navigate to the Settings icon (gear icon) -> System -> About.
* How to Update: Visit the official Kodi website kodi.tv to download and install the latest version compatible with your device. Most operating systems allow you to install over your existing version without losing data, but always back up if you have custom configurations.
Furthermore, a Stable and Fast Internet Connection
A reliable and high-speed internet connection is fundamental for streaming high-quality content without buffering. We recommend a minimum of 20-25 Mbps for HD streaming and higher for 4K.

Recommended: A Virtual Private Network (VPN) for Secure and Private Streaming
Using a VPN is highly recommended for secure and private streaming. It’s a critical step for protecting your privacy and security, especially when using third-party addons.
* Benefits:
* Privacy: Masks your IP address, preventing your ISP from monitoring your streaming activities.
* Security: Encrypts your internet traffic, protecting you from potential cyber threats.
* Bypassing Geo-restrictions: Access content that might be blocked in your region.
* Prevent ISP Throttling: Some ISPs throttle bandwidth when detecting streaming activity; a VPN can prevent this.

Step-by-Step Installation of The Crew Kodi Addon (Highly Visual Guide)
Follow these detailed steps to install The Crew Kodi addon. We’ve structured this guide to be highly visual, anticipating screenshots for each crucial action.
Step 1: Enable Unknown Sources in Kodi
Kodi, by default, restricts installations from unknown sources for security reasons. We need to enable this option to install third-party addons like The Crew.
1. From the Kodi home screen, click on the Settings icon (the gear icon) in the top-left corner.

2. Select System from the settings menu.

3. In the System window, navigate to the Add-ons tab on the left sidebar.

4. Toggle the “Unknown sources” option to ON.

5. A warning message will appear. Read it, understand the implications, and click Yes to proceed.

Step 2: Add The Crew Source to Kodi File Manager
Next, we will add the official source URL for The Crew repository to Kodi’s File Manager.
1. Go back to the Kodi home screen and click the Settings icon again.
2. Select File manager.

3. Click on Add source on the left or right side of the screen.

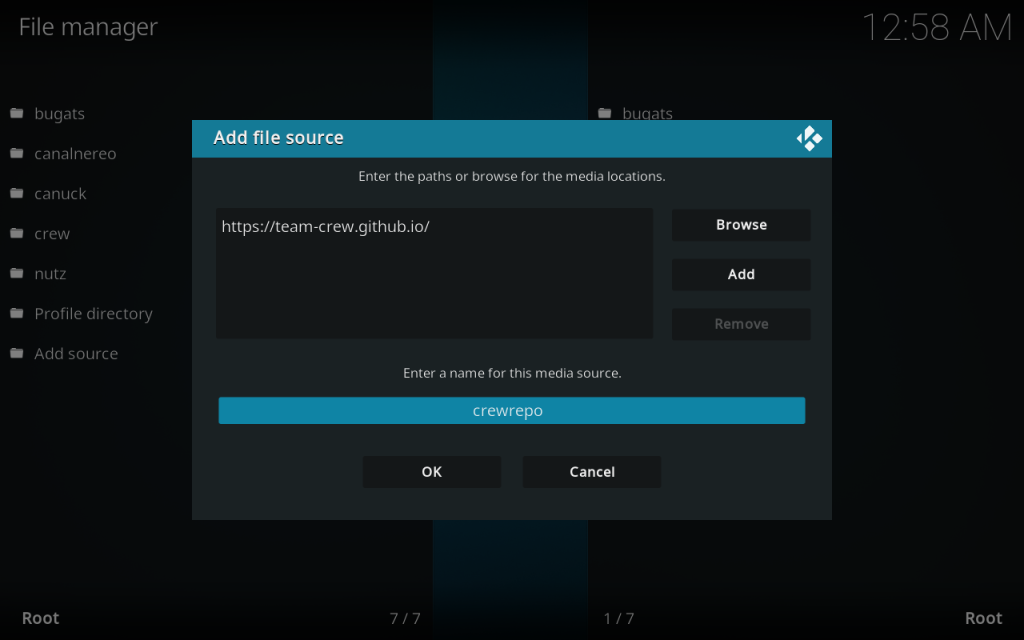
4. In the Add file source window, click on <None>.

5. Carefully type the official URL: https://team-crew.github.io (Double-check for typos!) then click OK.

6. Back in the Add file source window, highlight the box under “Enter a name for this media source” and type crewrepo (or any name you prefer). Click OK.
How to Install Cumination Kodi: Easy Step-by-Step Guide
Read More →7. Verify that crewrepo (or your chosen name) now appears in your File manager list.
Step 3: Install The Crew Repository from Zip File
Now we will install The Crew repository from the source we just added. This repository contains The Crew addon.
1. Return to the Kodi home screen and click on the Add-ons tab on the left sidebar.
2. Click on the Package installer icon (the open box icon) in the top-left corner.

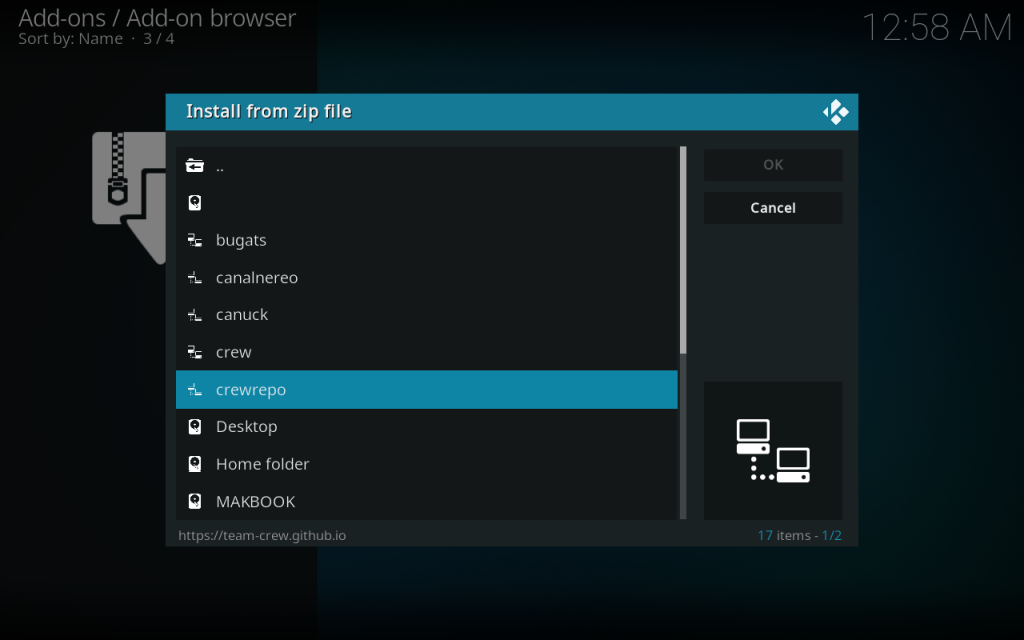
3. Select Install from zip file.

4. From the list, find and click on crewrepo (the name you gave the source in Step 2).

5. Select the zip file named repository.thecrew-x.x.x.zip (the numbers x.x.x will vary based on the latest version).

6. Wait for a notification in the top-right corner confirming “The Crew Repo Add-on installed.”

Step 4: Install The Crew Video Addon from Repository
With the repository installed, we can now install The Crew video addon itself.
1. From the Package installer screen, select Install from repository.

2. Choose The Crew Repo from the list of installed repositories.

3. Navigate to Video add-ons.

4. Select The Crew from the list.

5. On The Crew information screen, click Install.

6. A window showing Add-on: The Crew will be installed and additional add-ons will be installed as well. Do you wish to continue? will appear. Click OK to accept the installation of necessary dependencies.

7. Wait for the “The Crew Add-on installed” notification in the top-right corner.

Congratulations! You have successfully installed The Crew Kodi addon.
First Look: Navigating The Crew Addon
Once installed, launching and navigating The Crew is straightforward.
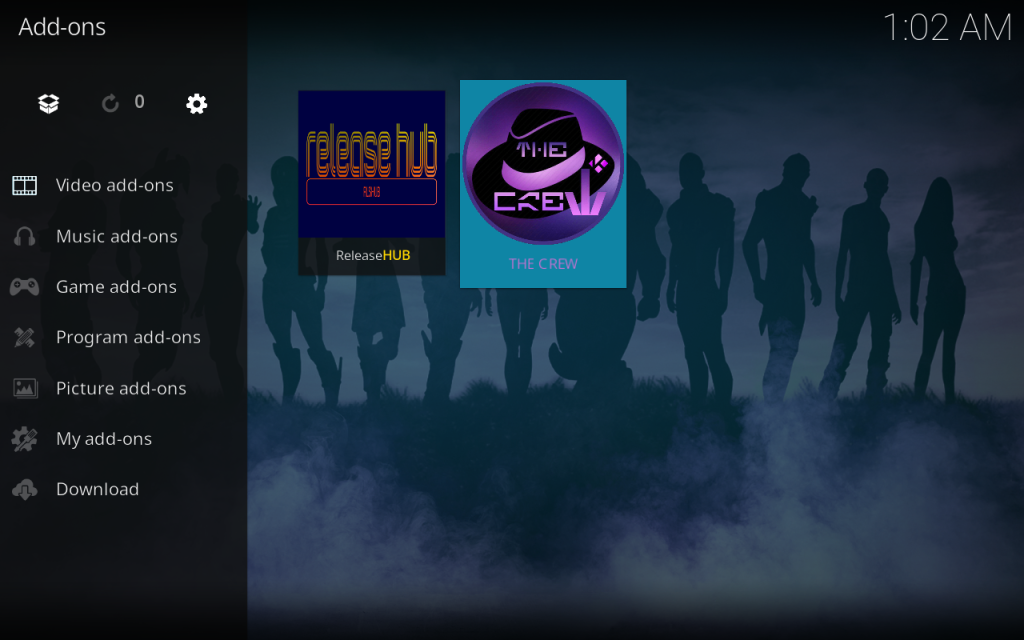
How to Launch The Crew from Your Kodi Add-ons Menu
1. From the Kodi home screen, select Add-ons from the left-hand menu.
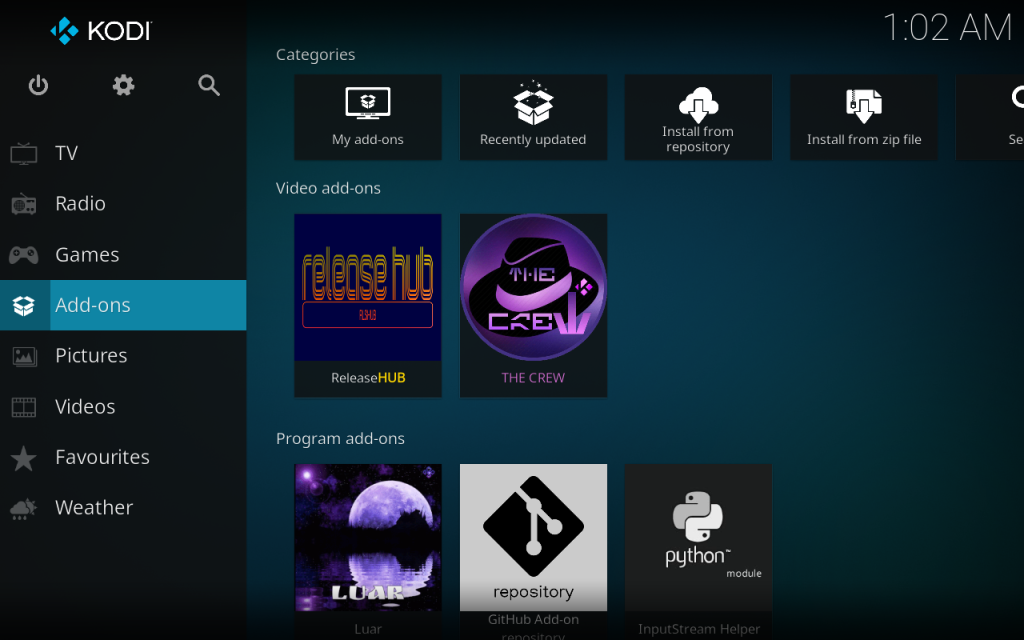
2. Go to Video add-ons.
3. Click on The Crew icon to launch it.
Overview of Main Content Categories
Upon launching, you’ll be presented with The Crew’s main menu, featuring clearly organized categories:
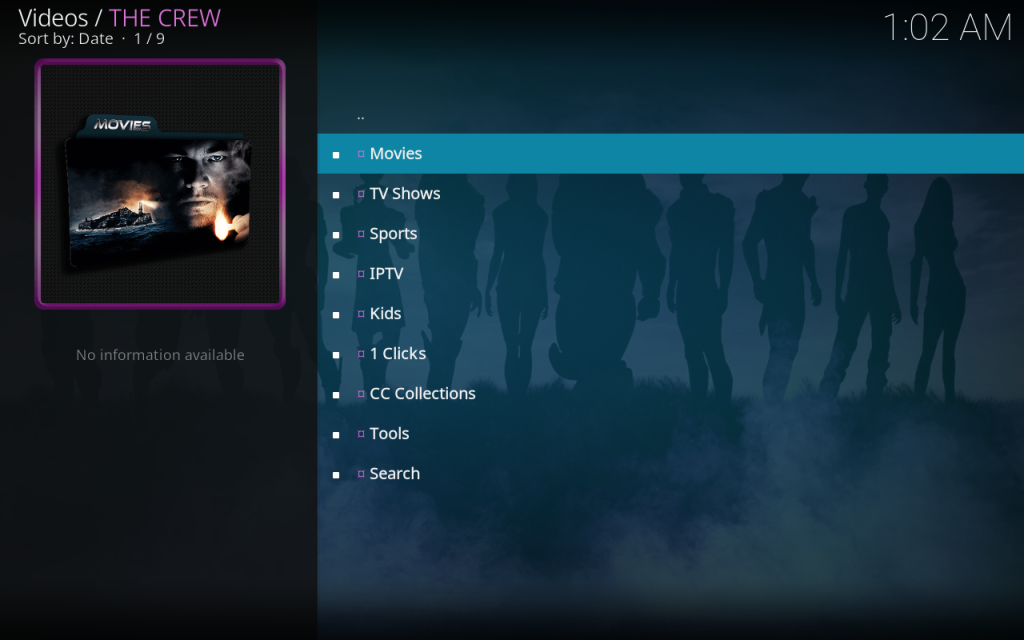
* Movies: Explore a vast collection of films, often categorized by genre, year, trending, popular, etc.
* TV Shows: Dive into seasons and episodes of your favorite series, with options to track progress.
* Sports: Find live sports streams and replays, often including sections for specific sports like Football, MMA, etc.
* Kids Corner: A dedicated section for family-friendly movies and TV shows.
* Tools: Access settings, clear cache, and integrate premium services.
* And more… (e.g., IPTV, Stand Up Comedy, Music, 1-Click, Documentaries, etc., depending on the current version).
Brief Explanation of Basic Navigation and Content Selection
To fully enjoy The Crew, understanding its basic navigation and content selection process is essential.
* Navigation: Use your remote or keyboard arrows to move between categories and content.
* Selection: Click on a category to enter it, then browse or use the search function if available.
* Playing Content: Once you select a movie or TV show episode, The Crew will scrape for available links. Choose a link (preferably a high-quality one from a reliable source) to start streaming.
Advanced Configuration: Enhance Your The Crew Kodi Streaming Experience
To truly elevate your streaming with The Crew, integrating premium services like Real-Debrid and Trakt is highly recommended.
Integrate Real-Debrid with The Crew Addon
What is Real-Debrid and its benefits?
Real-Debrid is a multi-hoster downloader that provides unrestricted access to premium file hosts. When integrated with Kodi addons like The Crew, it offers numerous advantages:
* Premium Links: Access to exclusive, high-quality streaming links (often 1080p and 4K) that are usually faster and more reliable than free links.
Best Kodi Addons No Debrid-Still Working in 2026: Free Streaming Guide
Read More →* Fewer Buffers: Premium links come from dedicated servers, significantly reducing buffering issues.
* More Available Streams: A greater variety of working links for almost any content.
Step-by-step guide to authorize Real-Debrid within The Crew settings:
1. Launch The Crew addon.
2. Navigate to Tools from the main menu.

3. Select ResolveURL Settings (or often “ResolveURL: Settings”).

4. In the ResolveURL window, go to the Universal Resolvers tab.

5. Scroll down to the Real-Debrid section.
6. Click on (Re)Authorize My Account.
7. A pop-up window will display an authorization code and instructions to visit https://real-debrid.com/device on a web browser.

8. On the Real-Debrid website, enter the code displayed on your Kodi screen and click Continue.
9. Once successfully authorized, you’ll see a “Real-Debrid Resolver Authorized” notification in Kodi.
Integrate Trakt with The Crew Addon
What is Trakt and its benefits?
Trakt.tv is a service that helps you track what you’re watching, discover new content, and sync your progress across multiple devices and Kodi addons.
* Tracking Watched Content: Automatically marks episodes and movies as watched.
* Syncing Libraries: Keeps your watch history and lists synchronized across all your Kodi installations and other Trakt-enabled apps.
* Personalized Recommendations: Get suggestions based on your viewing habits.
Step-by-step guide to authorize Trakt within The Crew settings:
1. Launch The Crew addon.
2. Navigate to Tools from the main menu.

3. Select Trakt Settings.

4. In the Trakt window, select the General tab.
5. Click on (Re)Authorize Trakt.

6. A pop-up window will display an authorization code and instructions to visit https://trakt.tv/activate on a web browser.

7. On the Trakt website, enter the code displayed on your Kodi screen and click Continue.

8. Allow Kodi to use your Trakt account.

9. Once successfully authorized, you’ll see a “Trakt: Successfully authorized!” notification in Kodi.

—
Comprehensive Troubleshooting for Common ‘Install The Crew Kodi’ Errors
Even with a perfect setup, you might encounter issues. Here’s how to tackle common problems with The Crew Kodi addon.
Fixing ‘Source not found’ or ‘Couldn’t retrieve directory information’
This error typically occurs during the repository installation phase.
* Check URL for typos: The most common cause. Double-check the URL https://team-crew.github.io for any spelling mistakes or extra spaces.
* Verify internet connection: Ensure your device has a stable internet connection. Try opening a website in a browser.
* Consider alternative URLs: If the official URL is temporarily down, search online for alternative, trusted sources from The Crew community.
* Clear DNS Cache: Sometimes, DNS issues can prevent resolution. Restarting your router or clearing your device’s DNS cache can help.

Resolving ‘Failed to install dependency’
Dependencies are additional components required for an addon to function.
* Ensure Kodi is updated: As mentioned in prerequisites, an outdated Kodi version can cause dependency conflicts.
* Clear Kodi cache: Corrupted cache can sometimes interfere with installations.
* Go to Kodi’s Settings (gear icon) > File Manager > Profile Directory > Add-on data > Packages. Delete any old zip files here.
* You might also use a maintenance addon (like Open Wizard) to clear the entire Kodi cache.
* Re-add source/repo: If issues persist, completely remove The Crew source and repository, then try the installation steps again from scratch.

The ONLY Essential Streaming Apps Guide You’ll Need for 2026
Read More →Addressing ‘Check log for more information’
This is a generic error indicating an underlying issue.
* General Advice:
* Restart Kodi: Often, a simple restart can resolve temporary glitches.
* Check internet connection: Ensure a stable connection.
* How to access Kodi log for advanced diagnosis:
* In Kodi, go to Settings (gear icon) > System > Logging.
* You might enable debug logging to capture more detailed information.
* Third-party addons (like Kodi Logfile Uploader) can help you easily access and share your log for community support.
Solving ‘No stream available’ or ‘No links found’
This means The Crew couldn’t find any working links for the content you selected.
* Verify Real-Debrid authorization: If you’re relying on Real-Debrid, ensure it’s correctly authorized and your subscription is active. Premium links are crucial for reliability.
* Try different content/categories: Some older or very niche content might have fewer links. Try a popular movie or TV show to test functionality.
* Clear cache within The Crew: The addon’s internal cache might store outdated link information.
* Go to The Crew > Tools > Clear Cache.
* Check provider settings: (Advanced) Within The Crew’s settings (often under Tools or Settings), you might find options to enable/disable specific link providers. Ensure popular ones are enabled.

Mitigating Buffering and Playback Issues
Buffering is frustrating but often fixable.
* Check internet speed: Use an online speed test (e.g., speedtest.net) to confirm your internet speed meets streaming requirements.
* Use a VPN: A VPN can prevent ISP throttling, where your internet service provider intentionally slows down your connection for streaming.
* Clear The Crew’s cache: As mentioned, clear the addon’s cache to remove old, potentially slow links.
* Go to The Crew > Tools > Clear Cache.`
* Adjust Kodi network settings (advancedsettings.xml – brief mention): For advanced users, modifying Kodi’s advancedsettings.xml file to increase cache size can significantly help with buffering, especially on devices with ample RAM. This is beyond the scope of a basic guide but is a powerful optimization. Search for guides on “Kodi advancedsettings.xml buffering” for detailed instructions.

—
Optimizing The Crew’s Performance and Settings
Fine-tuning The Crew’s settings can significantly improve your streaming experience.
Regularly Clearing Cache
The Crew accumulates temporary data (cache) over time, which can slow it down or cause issues.
* How to clear cache within The Crew:
1. Launch The Crew addon.
2. Navigate to Tools from the main menu.

3. Select Clear Cache. Confirm when prompted.

Regularly performing this (e.g., once a week) is good practice.
Provider Selection
The Crew scrapes links from various providers. You can enable or disable specific providers to optimize scraping speed and results.
* Within The Crew’s Tools or Settings menu, look for Providers or Scraper Settings.
* You can deselect providers that consistently return dead links or are slow, leading to faster scraping and more reliable link lists.

Playback Settings
Customize how The Crew handles playback.
* Default Player: You can often choose which internal or external player Kodi uses.
* Enable Auto-play Next Episode: For TV show binge-watchers, look for an option to automatically play the next episode in a series. This is typically found in The Crew’s main settings or specific TV Show settings.

Scraping Timeouts
To prevent The Crew from endlessly searching for links, you can set a timeout limit.
* In The Crew’s Tools or Settings, find Scraper Timeout or Source Timeout.
* Adjust this value (e.g., to 10-20 seconds) to ensure it stops searching if no good links are found within a reasonable timeframe, improving responsiveness.

—
Conclusion
You’ve made it! By following this master guide, you’ve successfully learned how to install The Crew Kodi addon, configure advanced features like Real-Debrid and Trakt, troubleshoot common errors, and optimize its performance for the best streaming experience.
The Crew opens up a vast library of movies, TV shows, live sports, and more, right at your fingertips. With your newfound knowledge, you’re well-equipped to navigate this powerful addon confidently. Remember the importance of regular maintenance, like clearing the cache, and staying updated with the latest versions of Kodi and The Crew for optimal performance.
Enjoy your boundless entertainment journey with The Crew! If this guide helped you, please consider sharing it or leaving feedback. Happy streaming!